Here’s how to setup replication between two MySQL 5.7 servers running on Ubuntu 16.04 LTS. Replication is commonly used for improved availability or to have an extra node to run analytic queries and reports. We also show how you can easily use OpsDash to monitor the replication status.
The Ubuntu 16.04 LTS repositories come with version 5.7 of MySQL, so installing it is only a matter of:
$ sudo apt-get install mysql-serverThe rest of the post assumes you have setup two identical nodes running MySQL, which can talk to each other over a private network, and that the nodes have the IPs:
master IP: 10.0.0.156
slave IP:  10.0.0.157
Master setup
First let’s setup the master. This process needs to take a consistent snapshot of the database, which involves placing a global read lock. This means the database will be read-only and all writes will be blocked for the duration of the lock. You’ll need to plan for this downtime.
1) Update the configuration:
In the file /etc/mysql/mysql.conf.d/mysqld.cnf uncomment or set the following:
bind-address = 10.0.0.156
server-id = 1
log_bin = /var/log/mysql/mysql-bin.log
This makes the master listen on the private IP, sets it server-id (which
must be unique for each node among a set of connected master and slave nodes) to
1, and enables binary logging.
2) Restart the MySQL service for changes to take effect:
sudo systemctl restart mysql3) Create a user for replication:
We’ll set the slave up to connect to the master via a dedicated account. The
account needs REPLICATION SLAVE privilege. Here we’re using the username
repl.
$ mysql -u root -p
Password:

mysql> CREATE USER 'repl'@'10.0.0.157' IDENTIFIED BY 'slavepass';
Query OK, 0 rows affected (0.00 sec)

mysql> GRANT REPLICATION SLAVE ON *.* TO 'repl'@'10.0.0.157';
Query OK, 0 rows affected (0.00 sec)
4) Lock the master:
Next we need to lock the master to get a consistent snapshot to bootstrap the slave with.
mysql> FLUSH TABLES WITH READ LOCK;
Query OK, 0 rows affected (0.00 sec)
Note that this lock is released either when you exit the mysql CLI client, or
when you issue UNLOCK TABLES. The lock needs to remain in place until the
mysqldump in step 6 below is complete.
5) Note down master replication log position:
mysql> SHOW MASTER STATUS;
+------------------+----------+--------------+------------------+-------------------+
| File             | Position | Binlog_Do_DB | Binlog_Ignore_DB | Executed_Gtid_Set |
+------------------+----------+--------------+------------------+-------------------+
| mysql-bin.000001 |      613 |              |                  |                   |
+------------------+----------+--------------+------------------+-------------------+
1 row in set (0.00 sec)
This information will be needed to initialize the slave in a later step.
6) Dump the master db:
$ mysqldump -u root -p --all-databases --master-data > dbdump.sqlNote: you can also stop mysqld and transfer the db files. This page has more details.
7) Unlock the master databases:
You can do this either by exiting your mysql CLI shell, or by running:
mysql> UNLOCK TABLES;8) Copy the file to the slave:
Transfer the dump file securely to the slave, for e.g., using scp:
$ scp dbdump.sql 10.0.0.157:/tmpSlave setup
1) Update the configuration:
In file /etc/mysql/mysql.conf.d/mysqld.cnf, uncomment or set the following:
bind-address = 10.0.0.157
server-id = 2
log_bin = /var/log/mysql/mysql-bin.log
Like for the master above, this makes the slave listen on the private IP, sets
it server-id (this time to 2), and enables binary logging. While binary
logging is not strictly necessary, it makes sense to keep the slave
configuration as close to the master’s as possible, in case the slave is
promoted to a master. It also allows this slave to act as the master for another
slave.
2) Restart the MySQL service for changes to take effect:
sudo systemctl restart mysql3) Import the db dump:
Import the dump file you created at the master and copied over to this slave:
$ mysql -u root -p < /tmp/dbdump.sql4) Setup the slave to talk to the master:
$ mysql -u root -p
Password:

mysql> STOP SLAVE;
Query OK, 0 rows affected, 1 warning (0.00 sec)

mysql> CHANGE MASTER TO
    -> MASTER_HOST='10.0.0.156',
    -> MASTER_USER='repl',
    -> MASTER_PASSWORD='slavepass',
    -> MASTER_LOG_FILE='mysql-bin.000001',
    -> MASTER_LOG_POS=613;
Query OK, 0 rows affected, 2 warnings (0.01 sec)

mysql> START SLAVE;
Query OK, 0 rows affected (0.00 sec)
At this point, the slave is in sync with the master and ready to accept and
replay changes made to the master. The values mysql-bin.000001 and 613
come from the output of the SHOW MASTER STATUS that you ran earlier.
Test if the replication is working
And you’re done! If you got this far without any errors, create a new table/row on the master. The changes should be propagated more or less instantly to the slave. Check if the changes appear on the slave.
Setup Monitoring
OpsDash is a self-hosted server and service monitoring solution, which can monitor MySQL instances. It’s free to use for up to 5 servers and services. Let’s see how to set it up for this case:
1) Install OpsDash server:
Download and install the OpsDash server on any machine that can connect to the MySQL servers.
$ wget https://packages.rapidloop.com/downloads/opsdash-server_1.8_amd64.deb
$ sudo dpkg -i opsdash-server_1.8_amd64.deb
OpsDash should be up and running after these commands. You can browse to
http://the.server:8080/ to see the OpsDash UI, where the.server is the
IP of the server you installed OpsDash on. Remember to open up the port in your
firewall if you need to.
2) Create a MySQL user:
OpsDash needs to connect to the MySQL server and collect metrics. Let’s create a new user for this:
$ mysql -u root -p
Password:

mysql> CREATE USER 'opsdash'@'%' IDENTIFIED BY 'opsdashpass';
Query OK, 0 rows affected (0.00 sec)

mysql> GRANT PROCESS, REPLICATION CLIENT ON *.* TO 'opsdash'@'%';
Query OK, 0 rows affected (0.00 sec)
The PROCESS and REPLICATION CLIENT privileges allow OpsDash to query the
replication status. You can also replace the % with the actual OpsDash
server IP.
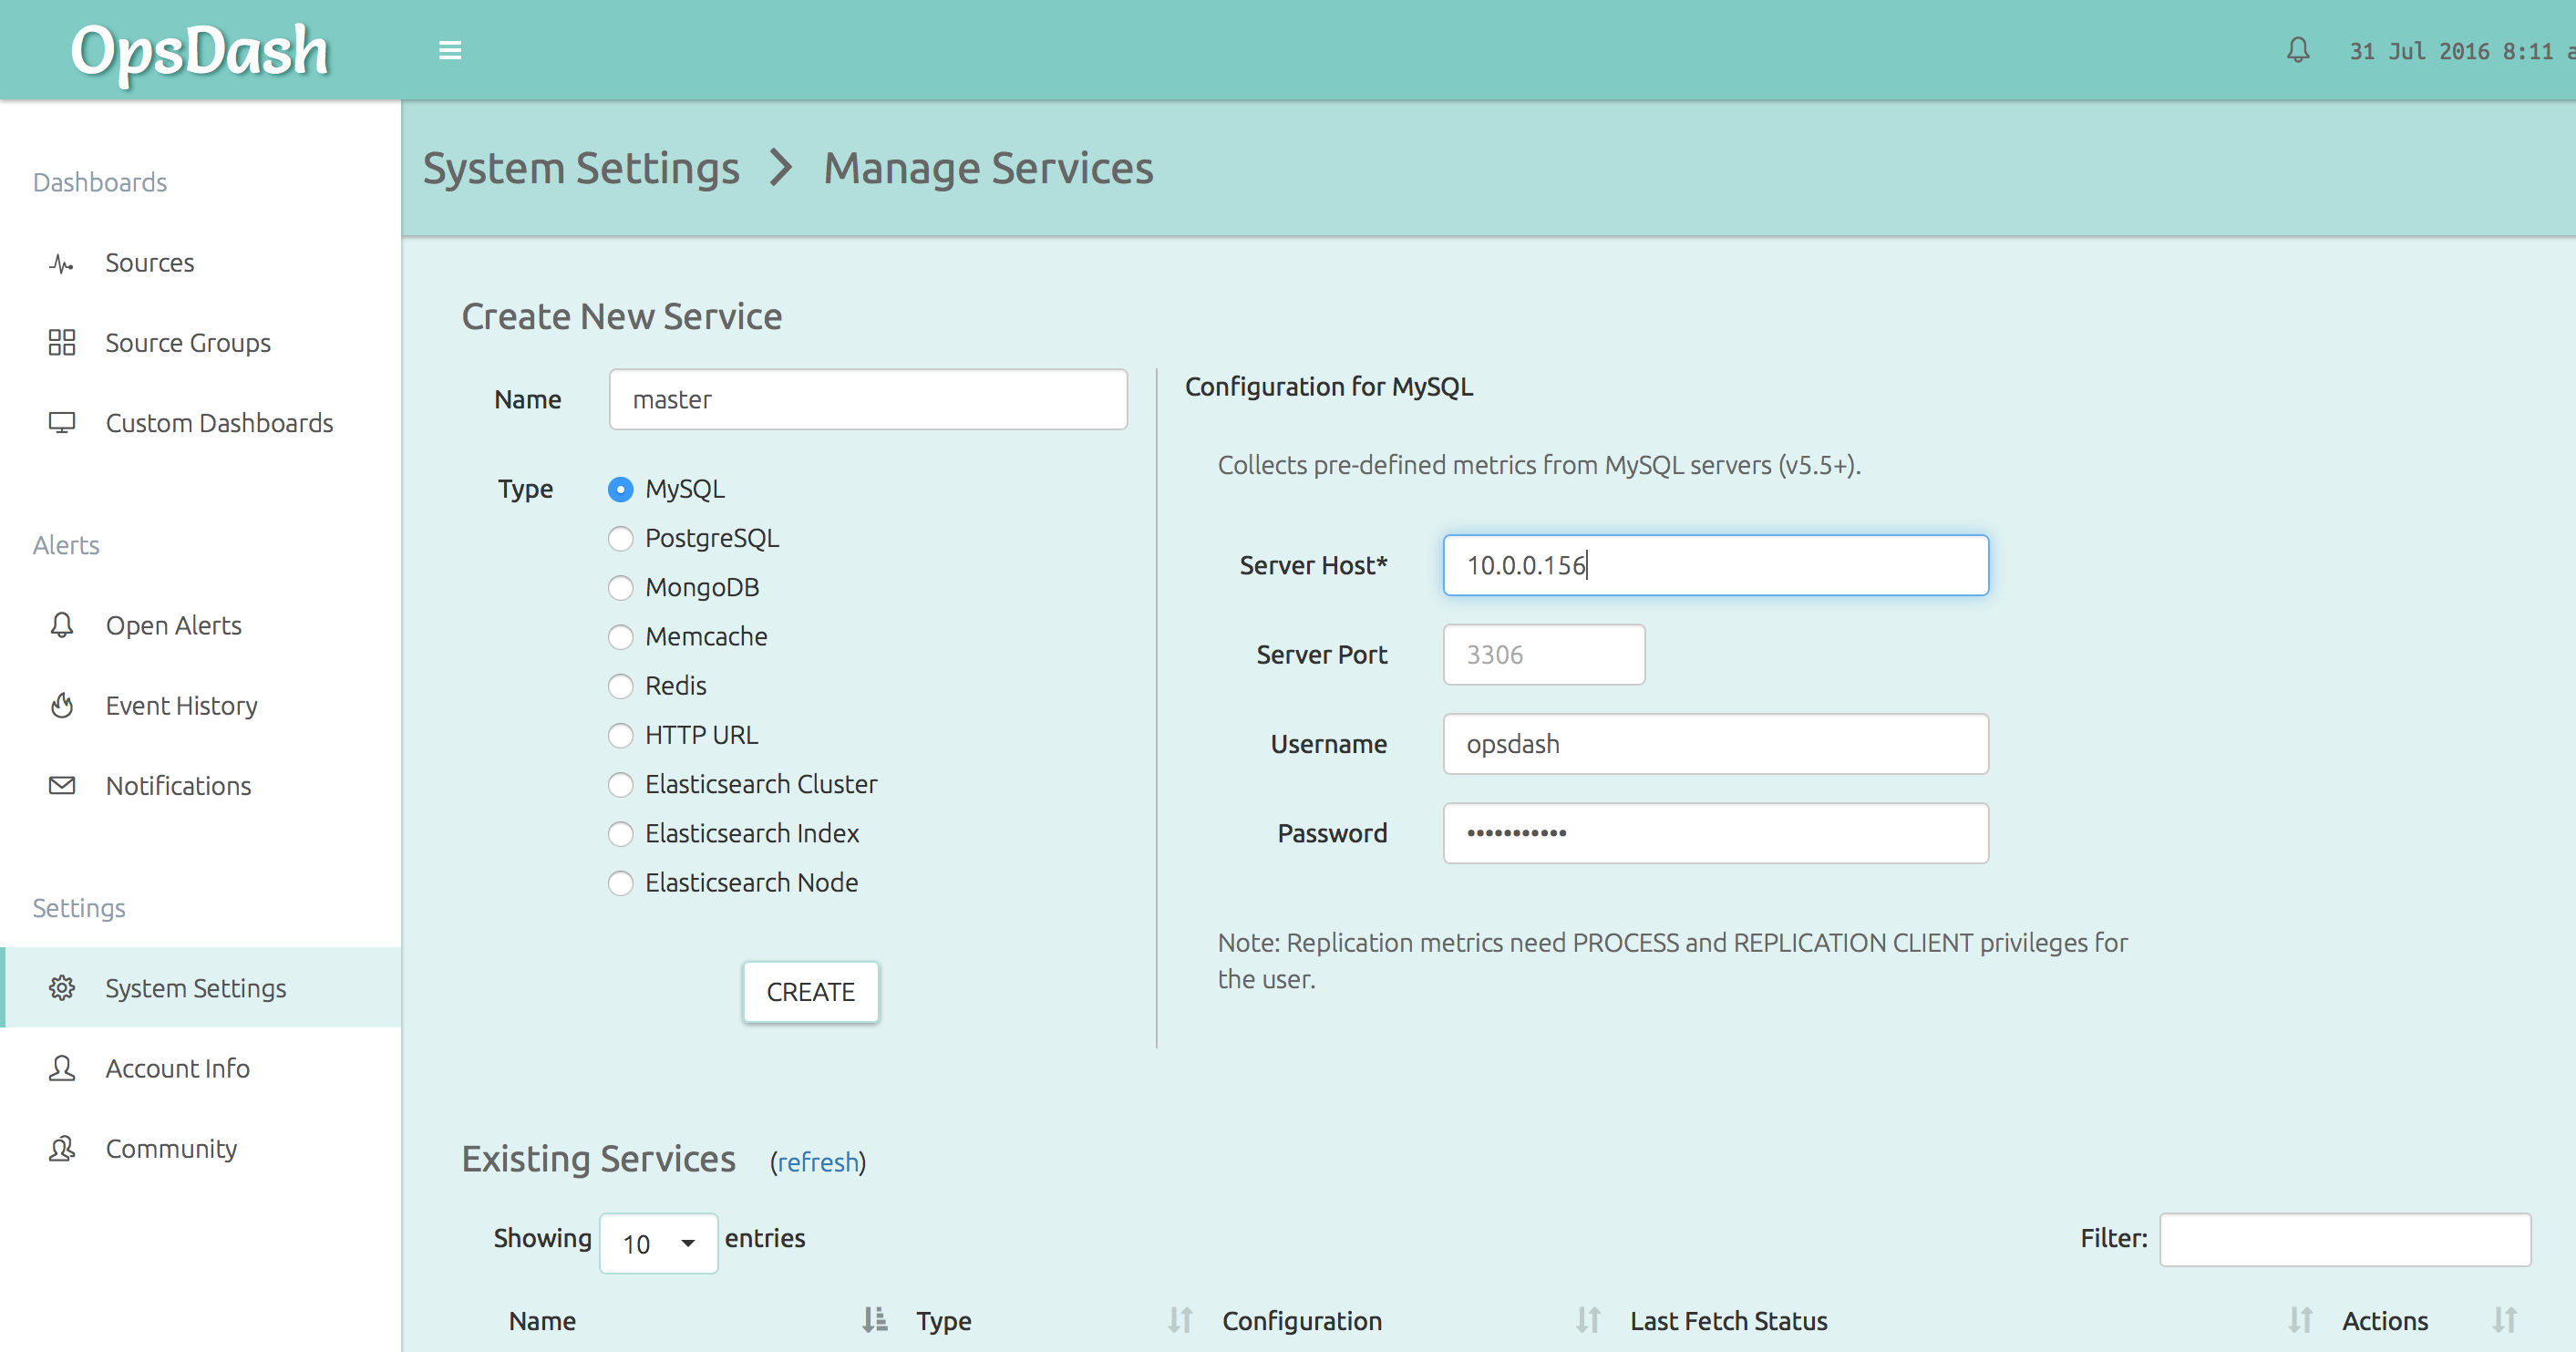
3) Tell OpsDash about the MySQL servers:
From the OpsDash UI, let’s add an entry for each of the MySQL instances. From the System Settings -> Services page, add a MySQL service, supplying the IP, username (“opsdash”) and password (“opsdashpass”):
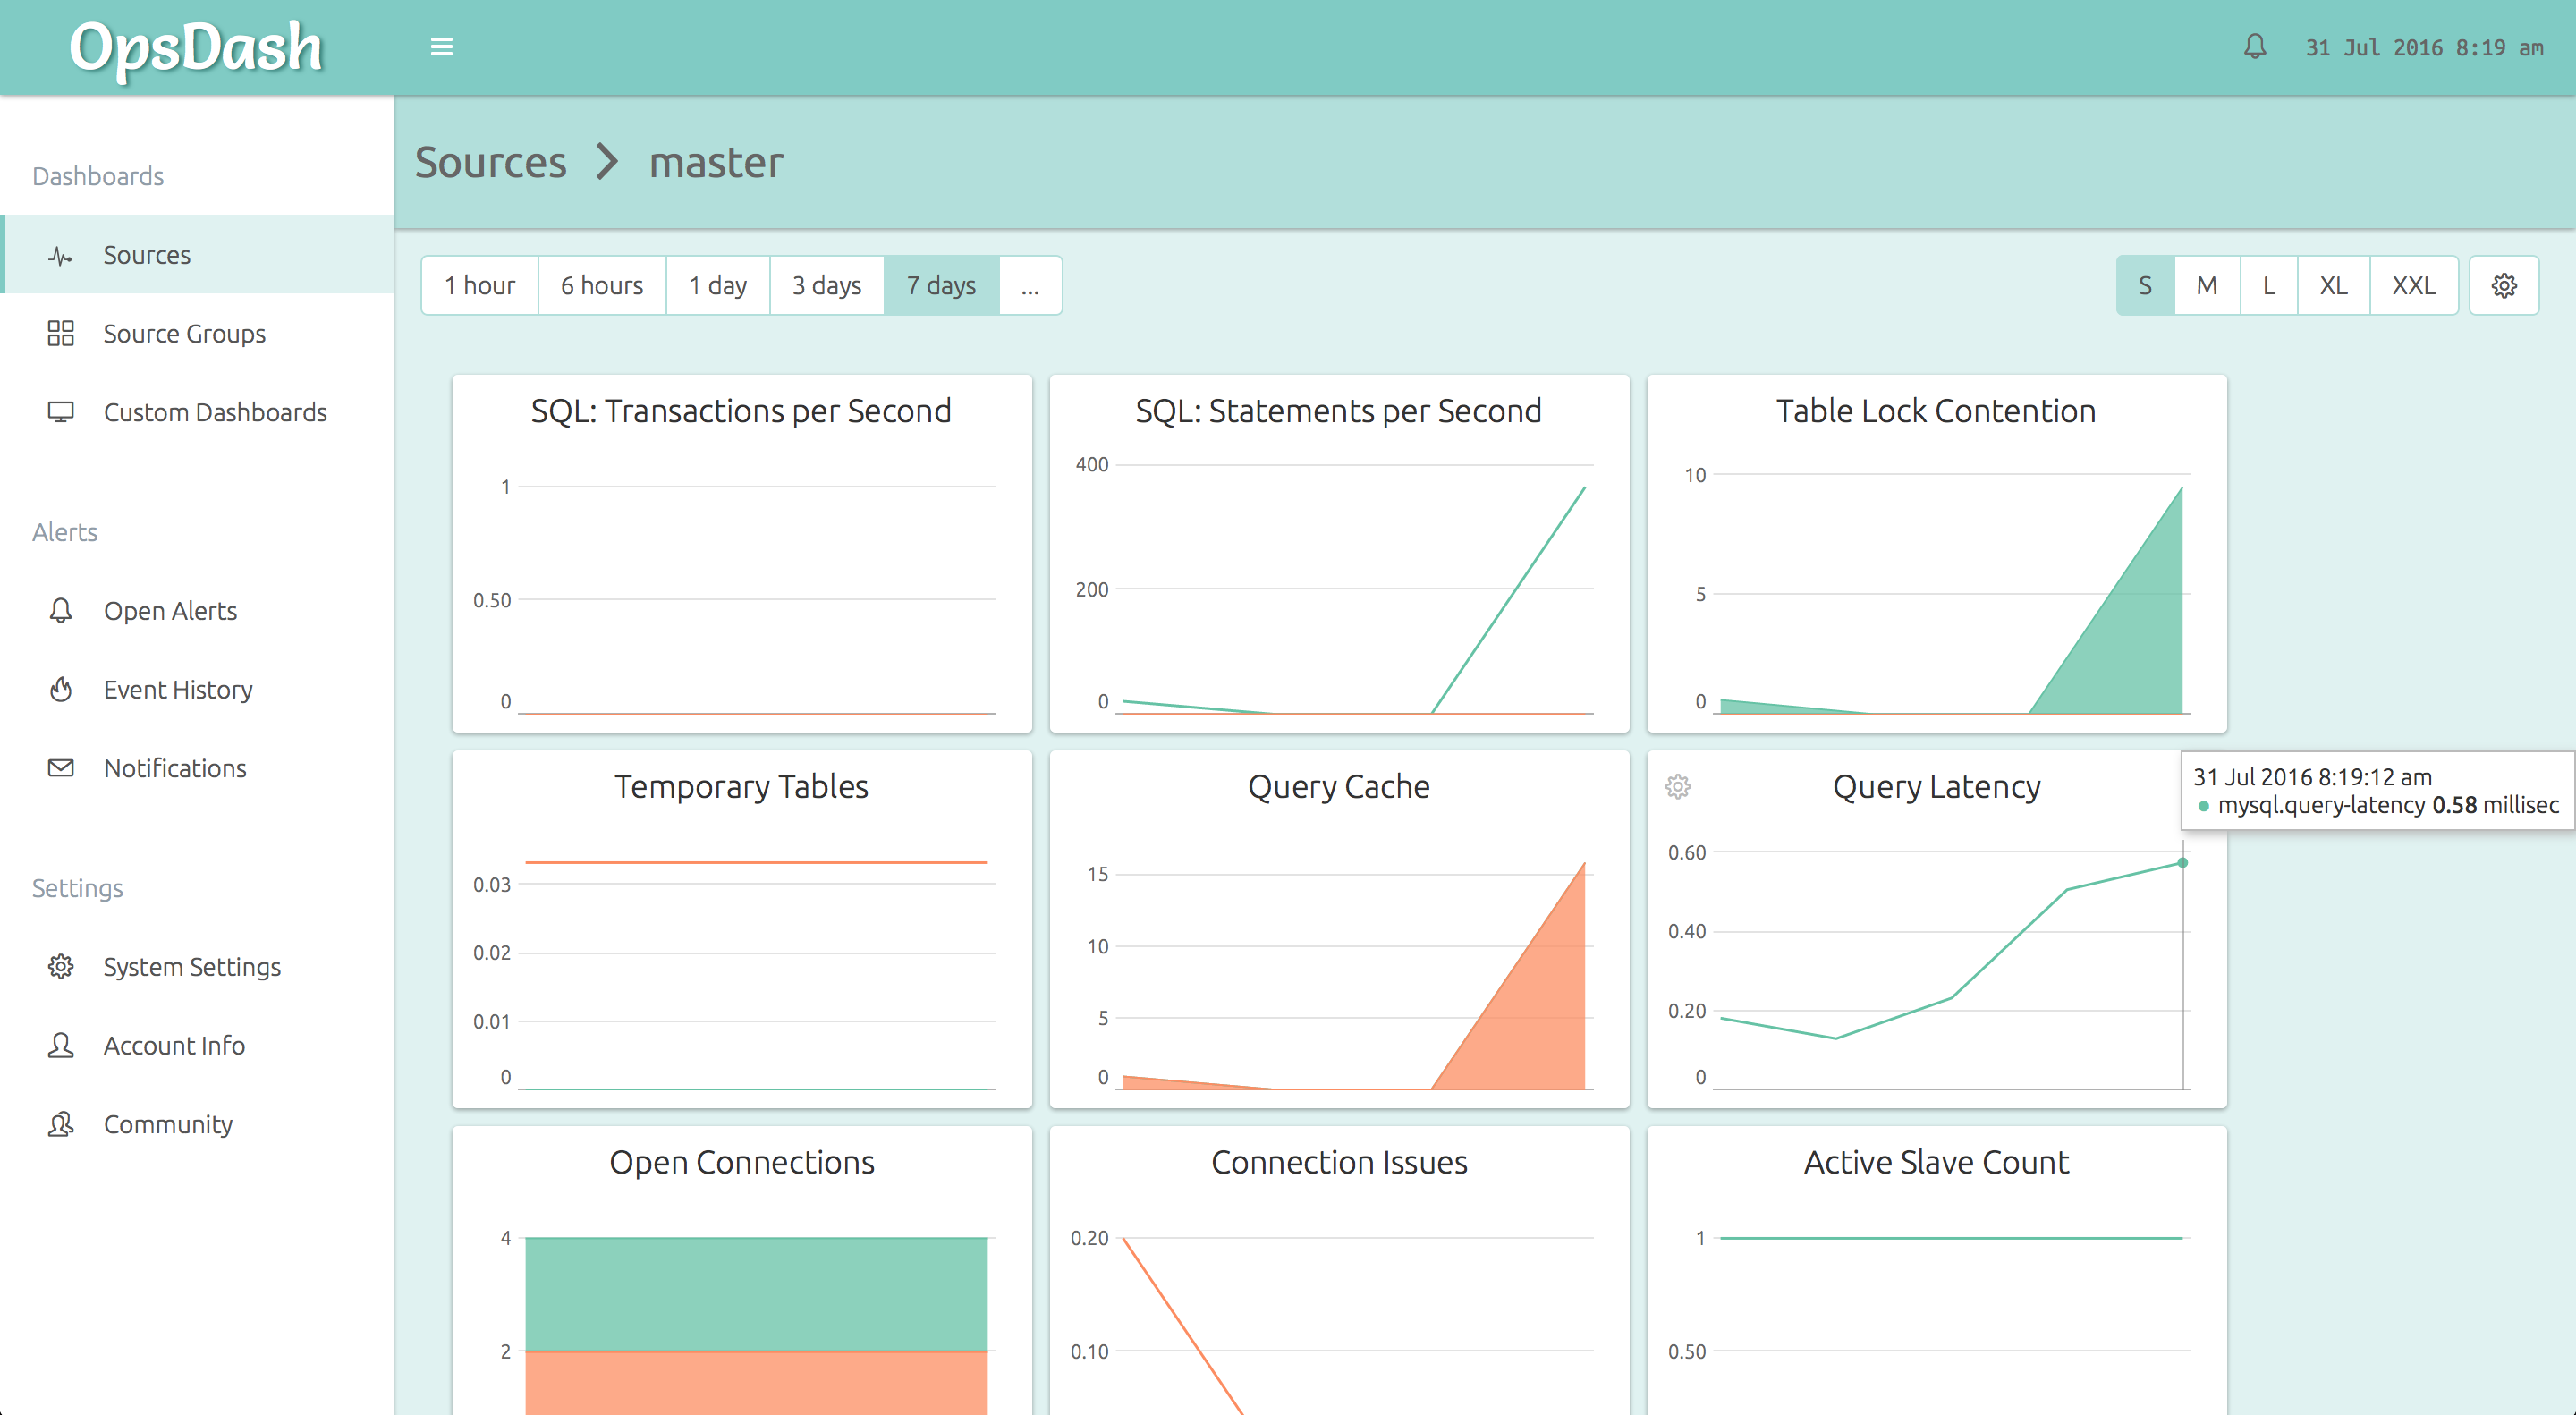
4) See the dashboards:
The dashboard for the master (Sources -> “master”) shows various health and performance metrics, including the active slave count (which should be 1). You can click on the graph and set an alert for when it drops below 1. OpsDash can notify you via email, Slack, HipChat, PagerDuty or Pushbullet when alerts happen.
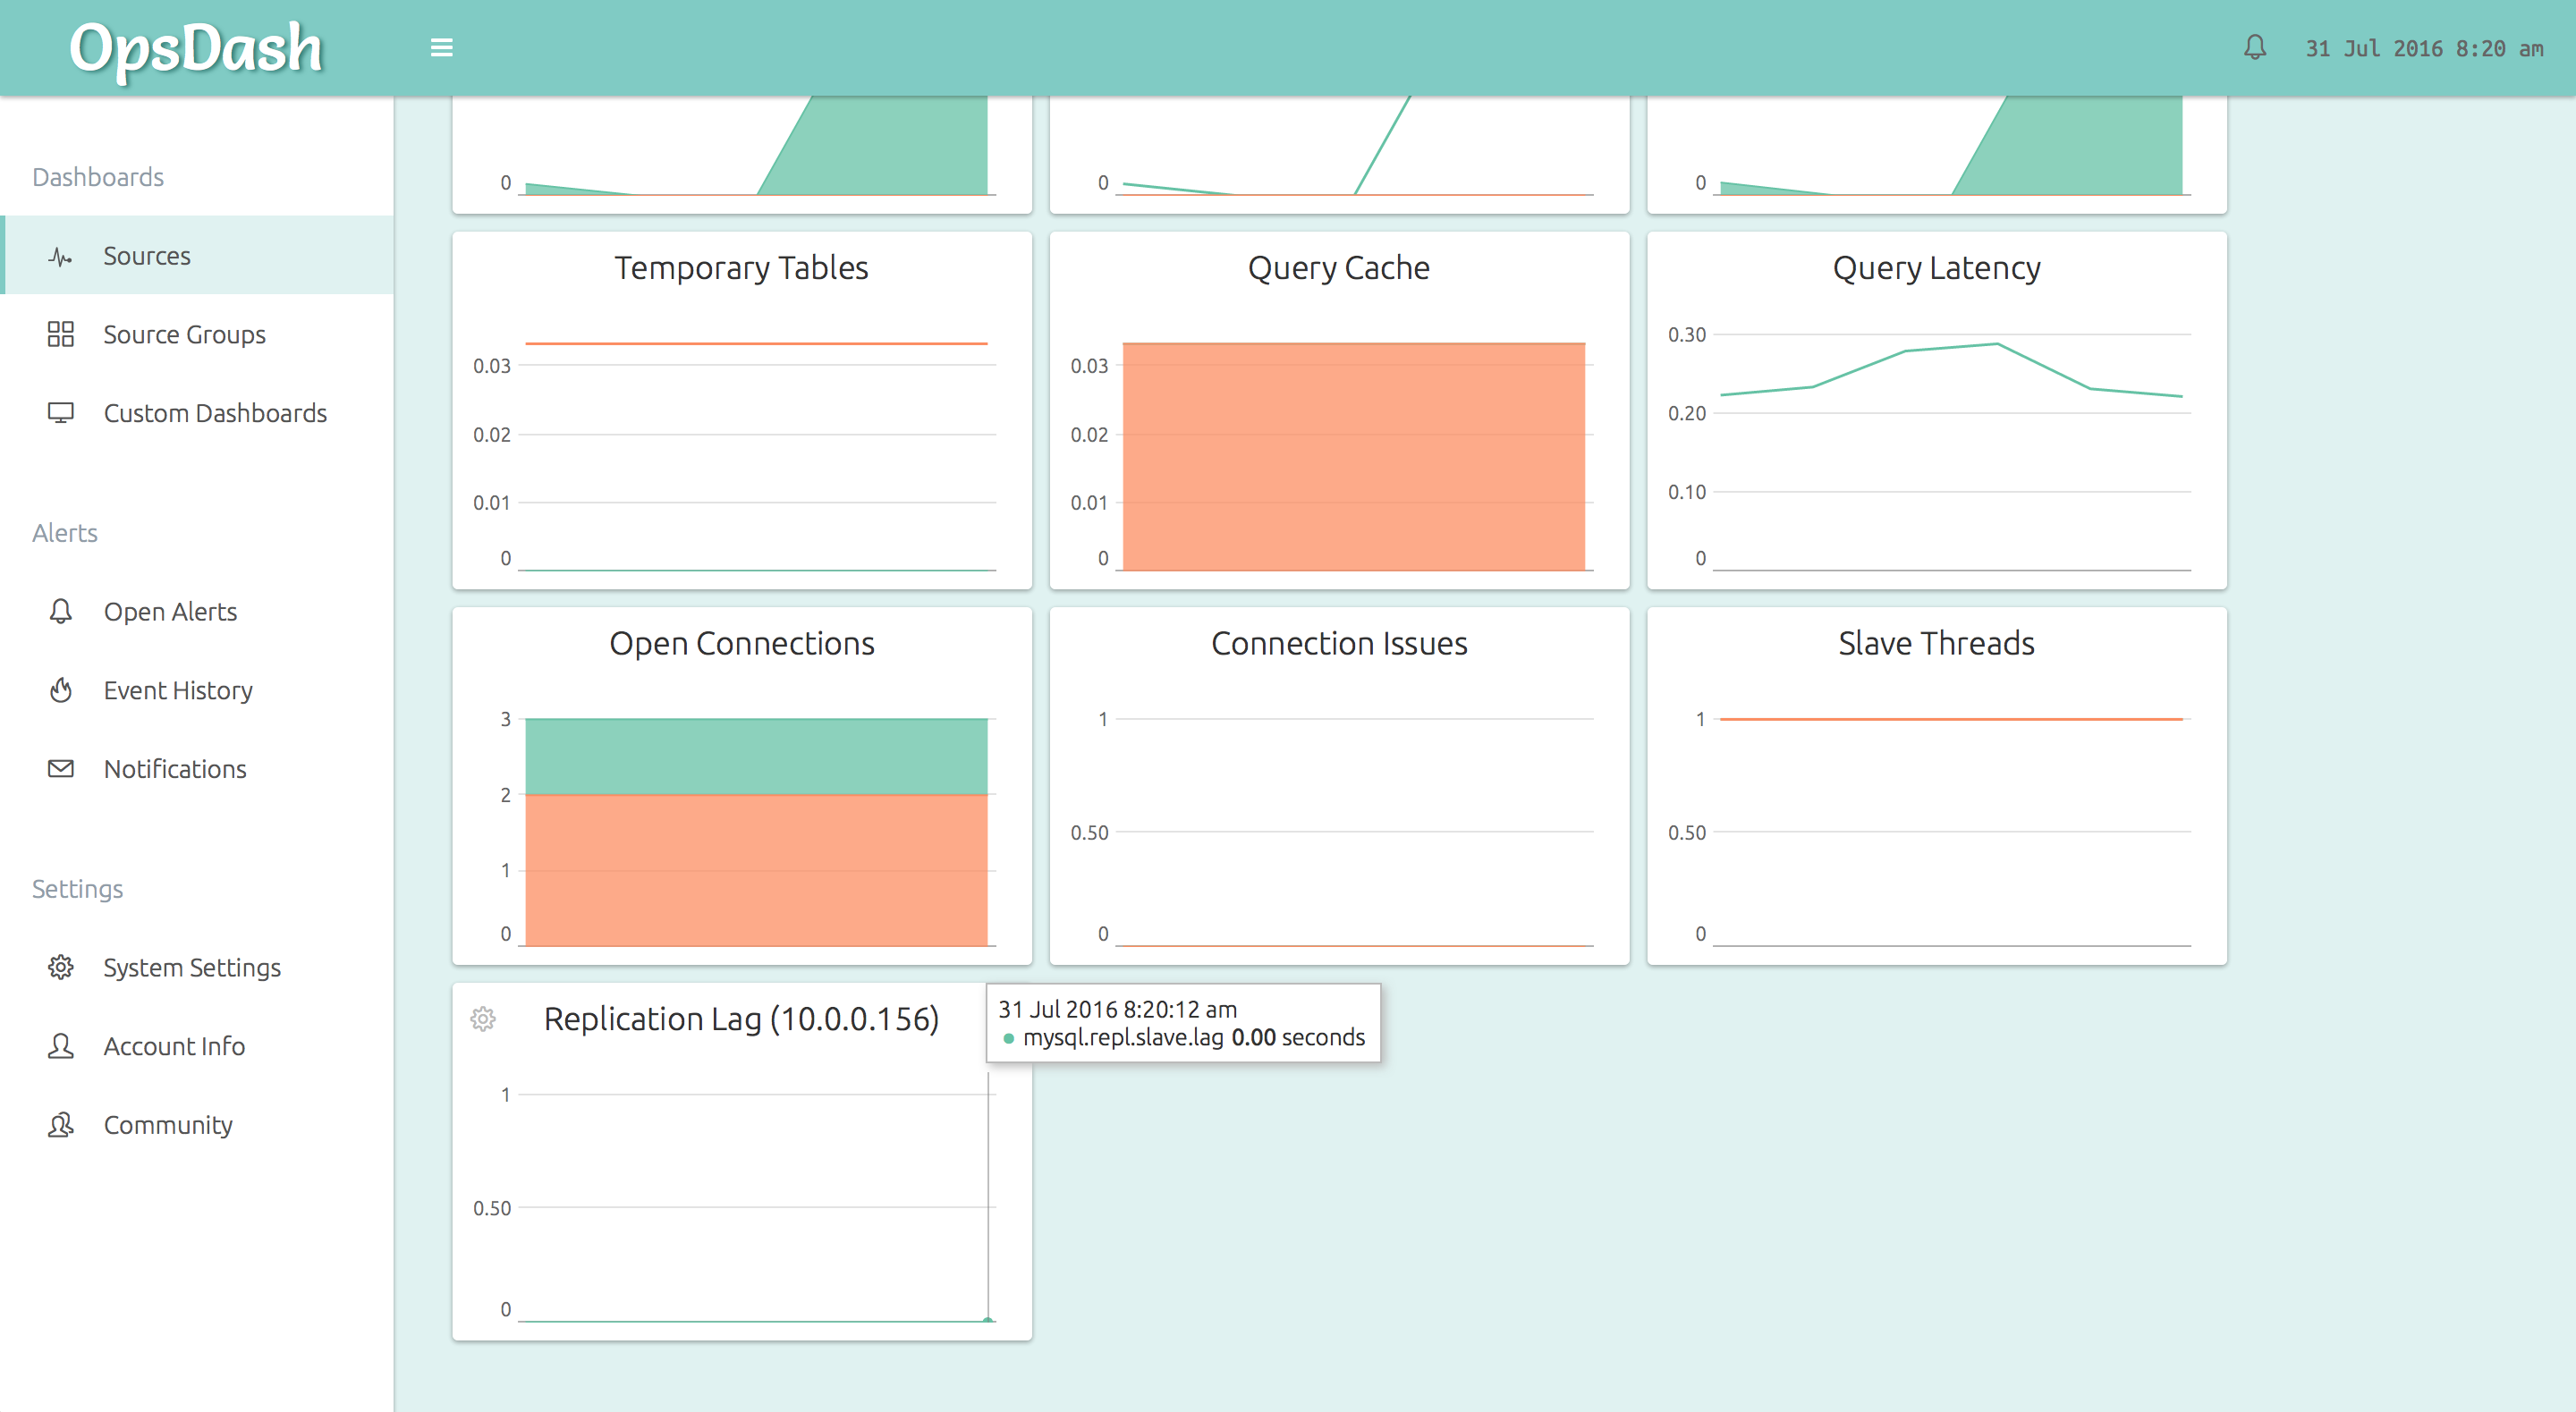
The slave dashboard includes the replication lag (in seconds), as well as the slave thread counts (there should be 1 slave I/O thread and 1 slave SQL thread running in normal course):
Manual Failover
Finally, let’s see how the slave MySQL can be promoted to a master manually. Note that this does not cover unplanned/automated failover, only the case when the failover has been planned and is being executed manually – like for a version upgrade or hardware upgrade.
1) Stop modifications to the master
The connections to the master must be stopped first, so that there are no more changes happening on the master.
2) Wait for replication to finish
All changes should be replicated to the slave, and the slave should finish applying them. You can check this by running “SHOW PROCESSLIST” on the master:
mysql> SHOW PROCESSLIST;
+------+------+------------------+------+-------------+--------+---------------------------------------------------------------+------------------+
| Id   | User | Host             | db   | Command     | Time   | State                                                         | Info             |
+------+------+------------------+------+-------------+--------+---------------------------------------------------------------+------------------+
| 2507 | repl | 10.0.0.157:55388 | NULL | Binlog Dump | 212496 | Master has sent all binlog to slave; waiting for more updates | NULL             |
| 2912 | root | localhost        | NULL | Query       |      0 | starting                                                      | show processlist |
+------+------+------------------+------+-------------+--------+---------------------------------------------------------------+------------------+
2 rows in set (0.00 sec)
The State should read “Master has sent all binlog to slave; waiting for more updates”. This means the master has finished it’s part of the replication.
At the slave, running “SHOW SLAVE STATUS\G” gives the slave’s status:
mysql> SHOW SLAVE STATUS\G
*************************** 1. row ***************************
               Slave_IO_State: Waiting for master to send event
                  Master_Host: 10.0.0.156
                  Master_User: repl
                  Master_Port: 3306
[..snip..]
      Slave_SQL_Running_State: Slave has read all relay log; waiting for more updates
[..snip..]
```
The Slave_SQL_Running_State column should read “Slave has read all relay log; waiting for more updates”, indicating that the slave is also finished.
3) Promote the slave
Now you can promote the slave with the commands:
mysql> STOP SLAVE;
Query OK, 0 rows affected (0.02 sec)

mysql> RESET SLAVE;
Query OK, 0 rows affected (0.02 sec)
After these commands, the slave node will no longer talk to the master.
4) Reconfigure applications
All applications and jobs should be configured to talk to the new master. This completes the failover.
Further Reading
The MySQL Reference Manual has a chapter on replication, which documents all this and more. You can also read about other setups like multi-master replication and semisynchronous replication, and techniques like delayed replication and taking backups from slaves.
The MySQL Utilities contain tools that can be used to automate the steps of setting up replication and failing over.
You can find out more about OpsDash here. OpsDash is a self-hosted server and service monitoring solution with integrated support for MySQL replication monitoring.
Have more tips? Feel free to leave a comment below!